Add or update a member
Add a new member
- Search for the member before adding one. This prevents adding a duplicate member record.
-
The Search window displays with the results or if no matches are found it opens with the message no records found.
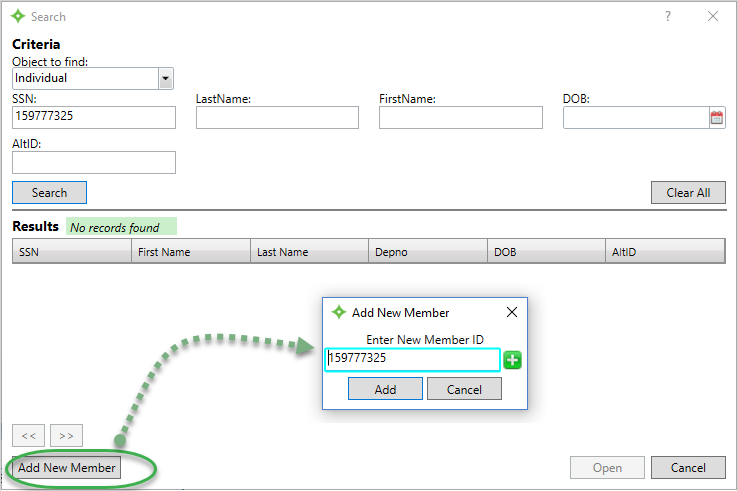
- Click
Add New Member. -
In the
Add New Memberdialog box, enter the new member's ID (must be 9 digits) or use the one that you searched with and then clickAdd.Note: to create a temporary member number. This way you can add a member into the system without having the member ID and update the member number later.
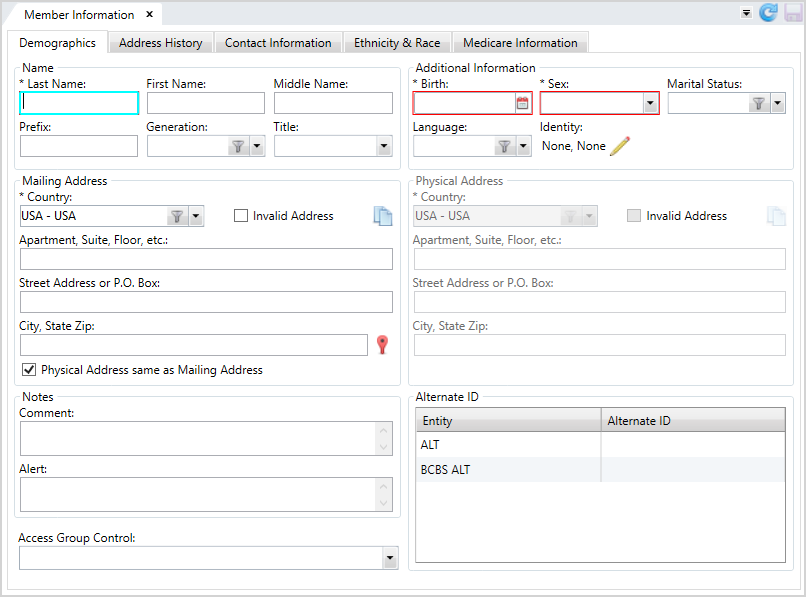

* indicates a required field
Field Description Name
Last Name*—The individual's last name.First Name—The individual's first name.Middle Name—The individual's middle name. You can enter a middle initial rather than a full name.Prefix—A title that displays at the beginning of a person's name to indicate marital status and gender, education, or occupation, (e.g., Dr., Mrs., PhD, etc.)Generation—Suffix to distinguish persons that share the same name in a family, (e.g. Jr., II, Sr, etc.) Select a generation from the list.Title—A professional or some other designation that comes at the end of a name, for example, CPA, MD, ESQ, etc. Select a title from the list.
Note: There's a 30 character limit across all Name fields. If what you enter for the first name, last name, middle name, prefix, generation, and title totals to 31 characters, you'll need to shorten the field(s) to add up to 30.Mailing Address
The address where the mail is delivered. The mailing address also displays on the Contact data tile
An area available on a session navigation pane that contains key information related to the session (e.g. provider, member, claim, information)..Country*—Select the country from the list.Invalid Address—Check box indicating the address isn't valid.- Address fields—Enter the remaining address information as appropriate. Use the address format required by your office. (Your office's standard might be to abbreviate the state rather than spell it out). The labels will change to Address 1, Address 2, and Address 3 for all countries except USA.
- If you only use two of the three address lines, the address is stored in the 2nd and 3rd boxes (Street Address/P.O. Box, and City, State, Zip). For example, if you enter information in the Apartment, City, State, and Zip, the information from Apartment is moved to the Street Address.
-
Physical Address same as Mailing Address—Check box to indicate the mailing and physical addresses are the same.Note: To make an address from the Address History tab the new current physical address, clear this check box first.
Notes
Comment—Information that will help others quickly respond to inquiries. You can add up to 999 characters. The Demographics data tile displays the first 150 characters. Point at the comment icon to see the full comment.
Alert—Information operators need to know about the individual, like if the individual requires special handling. You can add up to 999 characters. The first 150 characters show in the session for a few seconds - next to the person's name . Point to the icon to view the full alert text.
Access Group Control Select if the member should be associated with an access group. See Access Group Control for more details. Additional Information
Birth*—The individual's birth date. Click and select a date or enter a date in
 MM/DD/YYYYformat. Once the dependent record is saved, if you change the birth date, a message will show giving you the option to recalculate the effective dates.Relationship*—For dependents, the relationship to the member. Codes vary depending on your setup (e.g., 01—Spouse, 02—Child, P—Parent, etc.). If the relationship code is a dependent, the from effective date is set to the same as the birth date. The relationship code selected affects the termination limit methods available for the dependent. After saving the dependent record, if you change the relationship, you're given the option to recalculate the effective dates.Sex*—The individual's sex (M—male, F—female or U—unknown). Select unknown if you don't know the sex. Update the record once you do know. Depending on the relationship code when you add a new dependent, the sex could update automatically. You can change it if needed.Marital Status—The individual's marital status, (e.g., M—married, D—divorced).Language—The individual's preferred language.Identity—Only displays if GAP SAC <55>Track Member Dependent Gender and Sexual Orientationis set toY. This field tracks the member or dependent's gender identity and sexual orientation. Click to update the information.
Gender—The gender of the member or dependent. This information is self-reported and optional to track. Select from one of the below options:FemaleMaleNon-binaryI use a different term—Enter the preferred term in the text box.I choose not to answerForm left blank
Sexual Orientation—The sexual orientation of the member or dependent. This information is self-reported and optional to track. Select from one of the below options:Lesbian or gayStraight, that is, not gay or lesbianBisexualI use a different term—Enter the preferred term in the text box.I don't knowI choose not to answerForm left blank
Click
 to clear your selections or
  to refresh.
Physical Address The address where the individual resides. This might be different than the mailing address, for example, the mailing address could be a PO Box.
- If the physical address and the mailing address are the same, select the
Physical Address same as Mailing Addresscheck box in the Mailing Address area and you won't have to add a physical address.
See Update a member's address for details on how to enter the address.
Alternate ID
Entity— The name of the entity to which the alternate ID applies.Alternate ID—The ID assigned by or for an entity to the individual. Your system might be set up to assign alternate IDs for entities or you might have to manually enter an ID. To enter an ID, simply click in the entity'sAlternate IDcolumn and enter the ID. If the ID was system-generated, you won't be able to change it.
- Complete the remaining member information.
- Click the
Contact Informationtab and enter the new member's contact information. See Add contact information for details. -
Click
 to save.
 -
You can't add a dependent to a new member until you have fully completed and saved the record.
Update a member's information
- Make changes to the member's information as needed.
- To update address or contact information, refer to:
-
Click
to save.